
Hardware Engineering & Headend Architecture
Learning how to convert HDMI to IPTV involves connecting an uncompressed HDMI or SDI video output into a dedicated hardware encoder that compresses the raw video signal in real time using H.264 or H.265 codecs and packages it into an IP transport protocol (RTSP, UDP Multicast, HLS, or SRT) for distribution over local area networks or the internet.
Table of Contents: In-Depth Hardware Guide
- 1. Consumer Baluns vs Pro IPTV Encoders
- 2. Video Encoder Technical Specs Matrix
- 3. Signal Conversion Pipeline (4 Steps)
- 4. Step-by-Step Installation Blueprint
- 5. Best Encoders for Hotels, Bars & Studios
- 6. Physical Headend vs Cloud Service Cost
- 7. Pre-Encoded 4K Streaming Passes
- 8. Frequently Asked Questions
- 9. Conclusion & Next Steps
In commercial settings such as hotels, sports bars, corporate headquarters, fitness gyms, and worship centers, converting physical video feeds into IP network streams eliminates miles of expensive, fragile HDMI splitters and heavy coaxial cabling. With a single Cat6 network cable, you can deliver crystal-clear live television to hundreds of screens simultaneously with sub-second latency.
However, choosing the right hardware, configuring network protocols, and understanding an enterprise IPTV headend requires technical precision. A wrong codec choice can overwhelm your router, cause audio desynchronization, or create unwatchable buffering.
This practical guide explains how does an iptv encoder work, reviews what is the best video encoder for iptv across different commercial environments, walks through physical and software setup step by step, and compares the cost of building an on-premise hardware headend versus tapping into a managed cloud infrastructure like XIPTV PRO.
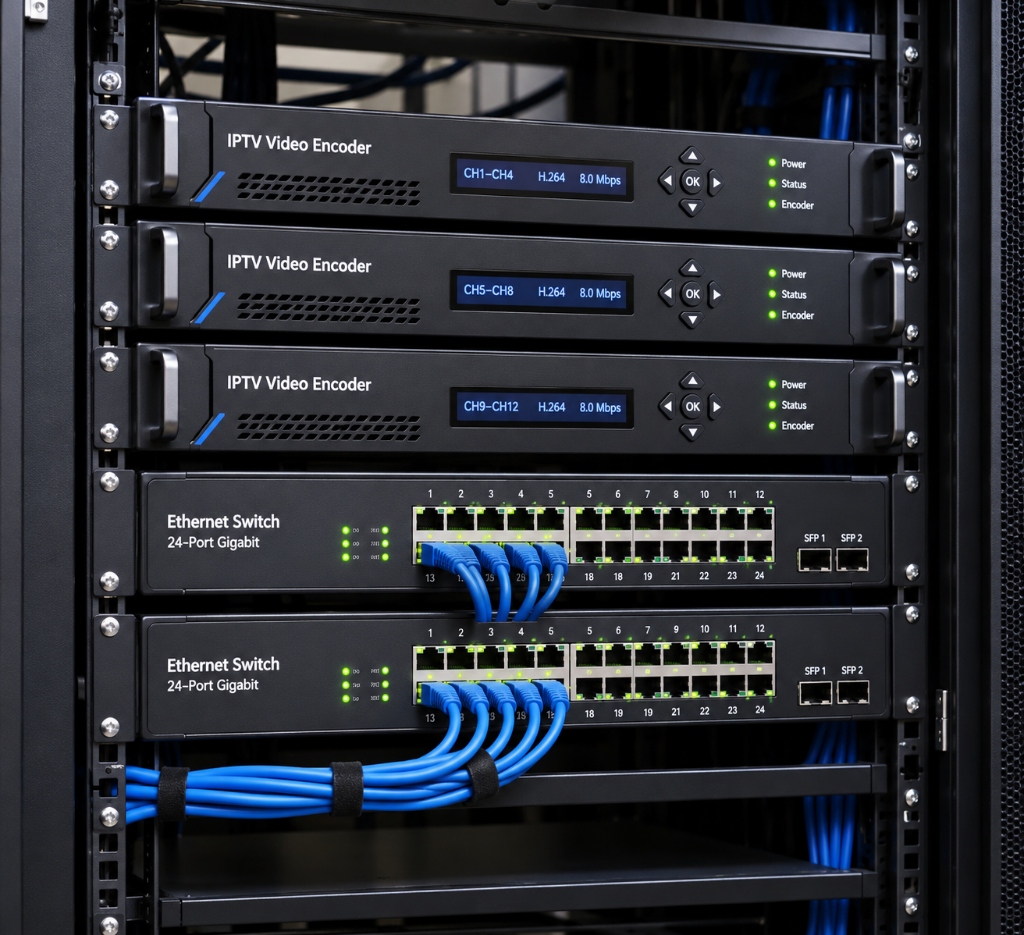
Quick Technical Comparison: Consumer HDMI Converters vs Professional IPTV Encoders
Before purchasing equipment, understand the critical difference between a basic point-to-point HDMI-over-IP extender and a true network video streaming encoder:
| Hardware Category | HDMI Extender Balun (Point-to-Point) | Standalone HDMI IPTV Encoder | Multi-Channel IPTV Headend Rack |
|---|---|---|---|
| Primary Function | Send 1 HDMI source to 1 distant TV | Compress HDMI into IP network streams | Compress 4 to 24 channels simultaneously |
| Network Type | Dedicated Cat6 cable (cannot use router) | Standard LAN router / switch compatible | Commercial Gigabit / 10G managed switch |
| Supported Protocols | Proprietary uncompressed packet protocol | RTSP, RTMP, HLS, UDP Multicast, SRT | UDP Multicast, RTP, HLS, MPEG-TS |
| Client Devices | Requires proprietary physical receiver box | Any Smart TV, FireStick, PC, VLC, TiviMate | Unlimited endpoint TVs via Multicast |
| Average Cost | $60 – $120 per set | $180 – $450 per single channel | $1,200 – $4,500 per rackmount unit |
| Best Suited For | Connecting 1 cable box to 1 patio TV | Bars, churches, streaming rigs, gyms | Hotels, luxury resorts, hospital campuses |
💡 Pro Tip for Cord-Cutters: If you simply want to stream thousands of entertainment channels without buying commercial hardware, explore our best IPTV service in USA review to see how cloud delivery eliminates hardware headaches.
Technical Specifications: The Anatomy of a Video Encoder
Before choosing an iptv video encoder, verify that its technical specifications align with your network capabilities and destination displays:
Hardware Video Encoder Specification Matrix
HDMI 1.4, HDMI 2.0 (Type-A) & 3G-SDI / 12G-SDI (BNC)
H.265 / HEVC (Main Profile) & H.264 / AVC (High Profile)
AAC, AAC+, AAC++, MP3, G.711 (Embedded HDMI or 3.5mm Analog)
4K UHD (3840×2160 @ 60fps), 1080p @ 60fps, 720p
32 Kbps to 32,000 Kbps (CBR / VBR)
HTTP, HLS, RTSP, RTMP, RTMPS, UDP/RTP Multicast, ONVIF, SRT
Sub-150ms (Low-Latency LAN Mode) | 2 to 5 seconds (HLS Buffer)
1000M RJ45 Gigabit Ethernet with PoE options
How Does an IPTV Encoder Work? The Signal Conversion Pipeline
To understand how to convert hdmi to iptv, it helps to examine what occurs inside the device when uncompressed video enters the HDMI port:
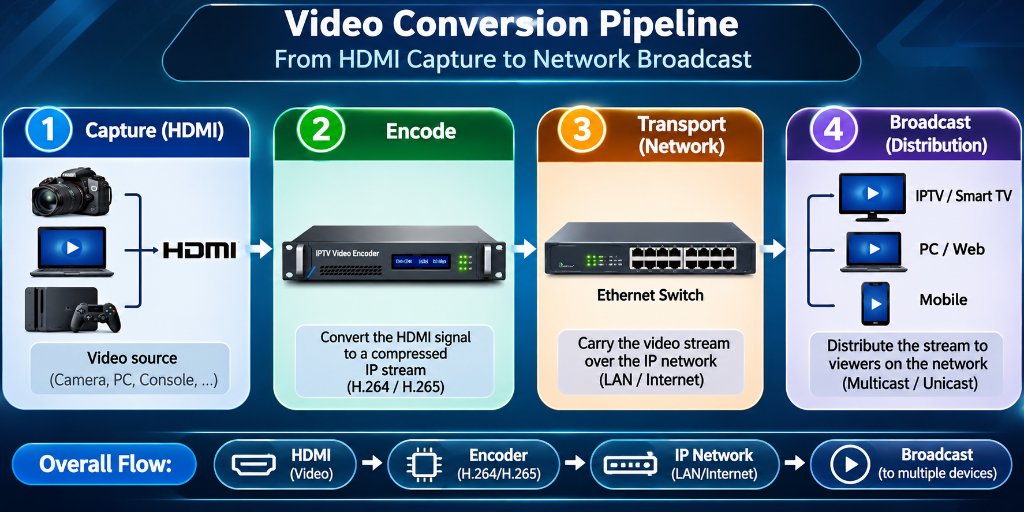
Step 1: Video Capture and Signal Ingest
Raw video from a media box, camera, or PC travels through an HDMI or SDI cable. High-end encoders feature an HDMI loop-through port, enabling you to feed a local confidence monitor or recording device with zero latency while simultaneously streaming the feed over IP.
Step 2: Hardware Compression (H.264 vs H.265)
An uncompressed 1080p stream generates roughly 3 Gbps of raw bandwidth, while an uncompressed 4K 60fps feed requires over 12 Gbps. Transmitting uncompressed video across a standard local network would instantly crash network switches. The encoder uses an onboard System-on-Chip (SoC) processor to compress the video:
- H.264 (AVC): Highly compatible with older smart TVs and web browsers, but requires roughly 8 to 12 Mbps for clean 1080p video.
- H.265 (HEVC): Essential for any 4k iptv encoder. H.265 offers 40% to 50% better compression efficiency, delivering crystal-clear 4K video at only 12 to 18 Mbps.
Step 3: Audio Multiplexing
The encoder captures digital audio embedded within the HDMI stream (or via a separate 3.5mm line-in jack) and compresses it into stereo or surround sound using AAC codecs, ensuring accurate lip-sync alignment with the compressed video frames.
Step 4: IP Protocol Packaging and Network Broadcast
The compressed data is wrapped into an IP transport container based on your destination:
- RTSP (Real-Time Streaming Protocol): Ultra-low latency (under 200ms), perfect for internal closed-circuit systems and security feeds.
- UDP / RTP Multicast: Sends a single stream across the network switch that hundreds of televisions can tune into without multiplying network bandwidth.
- HLS (HTTP Live Streaming): Slices video into short files, ideal for streaming to smartphones and web browsers over Wi-Fi.
- RTMP / SRT: The standard for transmitting live video across the public internet to remote cloud servers or platforms like YouTube and Twitch with error correction.
Step-by-Step Tutorial: How to Set Up an IPTV Encoder
Follow this practical configuration walkthrough to convert your first HDMI source into a live IP stream:
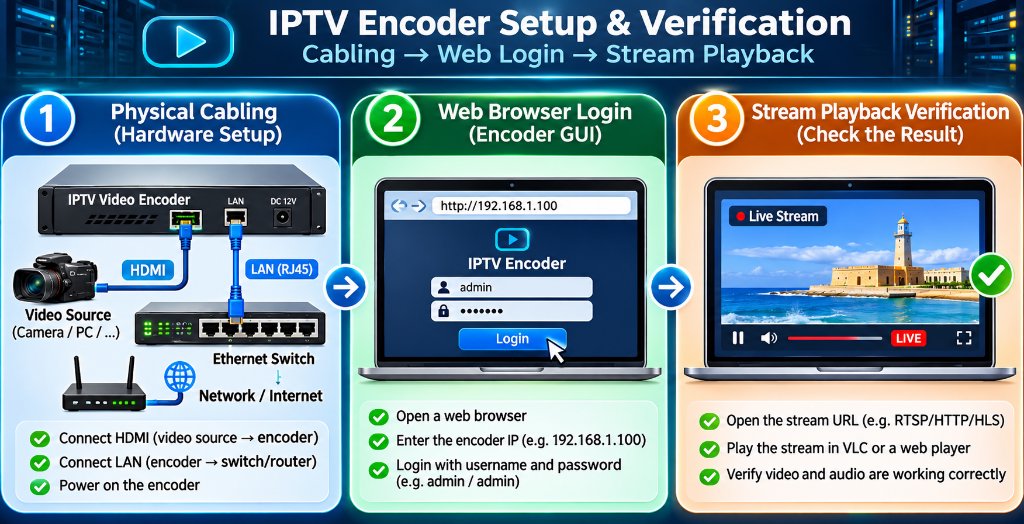
Step 1: Physical Cabling
- Connect your HDMI source (cable box, PC, camera) to the encoder HDMI IN port.
- Connect a Cat6 Ethernet cable from the encoder RJ45 port to your network switch.
- Plug in the 12V DC power adapter and verify the power and network LEDs illuminate.
Step 2: Access the Web Configuration GUI
- Check the user manual for the default factory IP address (commonly
192.168.1.168). - Configure your computer Ethernet adapter to the same subnet (e.g.,
192.168.1.100). - Open Chrome or Firefox and enter
http://192.168.1.168. - Log in with default administrator credentials (typically
admin / admin).
Step 3: Configure Encoding Parameters
- Navigate to the “Video & Encoding” tab.
- Select Video Codec: Choose H.265 (for 4K streams) or H.264 (for 1080p).
- Set Bitrate Control: Select CBR (Constant Bitrate) at 12,000 Kbps.
- Set Frame Rate: Select 60 fps for smooth sports motion.
Step 4: Enable Streaming Protocols
- In the “Stream Output” tab, toggle your desired protocol:
- Enable RTSP: Port 554 (e.g.,
rtsp://192.168.1.168:554/live/ch0) - Enable HLS: Port 8080 (e.g.,
http://192.168.1.168:8080/live/ch0.m3u8) - Enable Multicast: Address
238.0.0.1:1234(for multi-TV LAN distribution)
Step 5: Verify Playback on Client Devices
- Open VLC Media Player on a computer or TiviMate on an Amazon FireStick.
- Select “Open Network Stream” and paste your encoder URL.
- Confirm crisp, low-latency video and audio playback.
When utilizing UDP Multicast across commercial networks, always ensure your network switch has IGMP Snooping enabled. Without IGMP Snooping, multicast video packets flood every connected port, which can overwhelm office printers, Wi-Fi access points, and VoIP phone systems.
What is the Best IPTV Encoder for Different Commercial Environments?
Choosing what is the best iptv encoder depends entirely on your deployment scale, physical distance, and number of channels:
1. Which IPTV Encoder is Best for Hotels?
Hotels require high-density, multi-channel rackmount units capable of operating 24 hours a day with zero maintenance.
Top Choice: Multi-channel rackmount encoders from manufacturers like Kiloview (Cradle Series), TBS, or ZeeVee.
Key Feature Needed: Support for 8 to 24 HDMI inputs in a single 1U chassis, outputting UDP Multicast streams directly into hotel smart TVs running hospitality middleware.
2. The Best IPTV Encoder for Sports Bars and Restaurants
Sports bars typically need to distribute 8 to 16 satellite feeds to dozens of screens around the dining room.
Top Choice: URayCoder 8-Channel HDMI Encoder or Osprey Talon Series.
Key Feature Needed: Low-latency RTSP and UDP streaming, low power consumption, and independent web control per channel so bartenders can switch sources from an iPad.
3. Broadcast Studios and Live Venues: When to Choose an SDI IPTV Encoder
If your video cameras are located more than 30 feet away from your equipment rack, standard HDMI cables suffer severe signal degradation.
Top Choice: An sdi iptv encoder (such as the Kiloview E1-s or Magewell Ultra Stream SDI).
Key Advantage: SDI cables use heavy-duty coaxial cabling with locking BNC connectors that carry broadcast-grade video over 300 feet with zero latency or jitter.
Building an On-Premise IPTV Headend vs Subscribing to an IPTV Service
Understanding the cost and engineering required to build a physical iptv headend highlights why cloud-hosted services have become so popular:
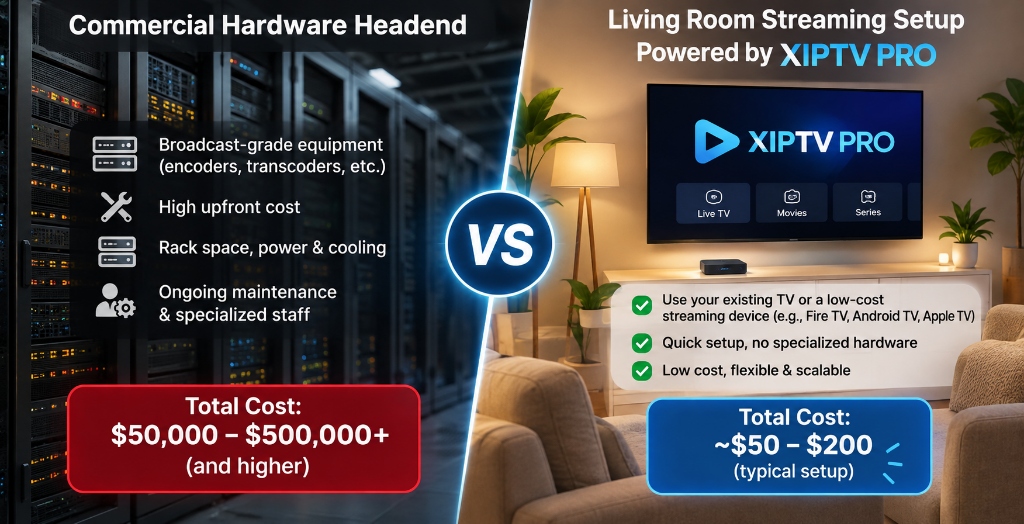
If a business or homeowner wants to create an on-premise IPTV system with 100 channels, here is the real financial equation:
Real Costs of Building a Physical 100-Channel Headend
- 100 Satellite/Cable Receivers: $10,000 – $15,000
- Multi-Channel Hardware Encoders (100 ports): $15,000 – $25,000
- Commercial Managed Switches & Server Racks: $3,000 – $5,000
- Air-Conditioned Server Room & Power Backup: $4,000+
- Total Initial Investment: Over $32,000 (plus thousands in monthly electricity and technician maintenance).
While this infrastructure is necessary for 500-room luxury resorts or stadium hospitality suites, it is completely impractical for standard businesses, sports lounges, or home entertainment.
Modern cloud providers like XIPTV PRO operate industrial tier-4 headends on your behalf. By encoding 25,000+ channels on enterprise server clusters and routing video through 10Gbps CDN nodes with Anti-Freeze 10.0 protocols, you get instant broadcast-grade 4K streaming for just a few dollars a month. For a detailed breakdown of server uptime and speed tests, check our best IPTV service in USA review.
Transparent Pricing: Enterprise 4K Streaming for a Few Dollars a Month
Rather than investing thousands in video encoder hardware, you can tap into XIPTV PRO’s complete pre-encoded streaming infrastructure for less than the cost of a single HDMI cable:
| Subscription Plan | Total Price | Effective Monthly Cost | Channels & VOD Included | Direct Access |
|---|---|---|---|---|
| 1-Month USA IPTV Pass | $11.99 | $11.99 / mo | 25,000+ live 4K channels, 130K VOD, 24/7 support | View 1-Month Pass → |
| 3-Months USA IPTV Pass | $29.99 | $10.00 / mo | Full out-of-market sports and movie library | View 3-Months Pass → |
| 6-Months USA IPTV Pass | $44.99 | $7.50 / mo | Complete seasonal sports coverage | View 6-Months Pass → |
| 1-Year Premium Pass (Best Value) | $69.99 | $5.83 / mo | Maximum annual savings, instant setup, 7-day guarantee | Order 1-Year Pass → |
| 2-Years Ultimate Pass | $119.99 | $5.00 / mo | Long-term cord-cutters locking in the lowest rate | View 2-Years Pass → |
Every pass connects directly to popular player apps like TiviMate and IPTV Smarters Pro on FireStick, Smart TVs, and mobile devices with zero hardware configuration required on your end.
Frequently Asked Questions
What is an HDMI to IPTV converter?
An HDMI to IPTV converter is a dedicated hardware video encoder that takes an HDMI video signal from a camera, media box, or PC, compresses it in real time using H.264 or H.265 codecs, and outputs it as an IP stream across an Ethernet network.
How do you set up an IPTV encoder?
To set up an IPTV encoder, connect your video source to the HDMI input, plug an Ethernet cable from the encoder into your local network router, log into the encoder web management GUI using its default IP address, configure the video codec and bitrate, and enable your desired streaming protocol like RTSP or HLS.
Which IPTV encoder is best for hotels?
Hotels require multi-channel rackmount IPTV encoders that support UDP/RTP multicast streaming, H.265 compression, and IGMP snooping. Multi-channel encoders from brands like Kiloview, TBS, or ZeeVee allow hoteliers to distribute multiple guest channels over standard Cat6 cabling without overwhelming network switches.
What is the difference between an HDMI encoder and an SDI IPTV encoder?
HDMI encoders are primarily used for consumer and commercial media devices over short cable runs under 30 feet. SDI IPTV encoders utilize professional BNC locking connectors designed for broadcast cameras and studio production, supporting cable runs exceeding 300 feet with zero signal loss.
Is it cheaper to build a local IPTV headend or subscribe to an IPTV service?
Building a local IPTV headend requires thousands of dollars in dedicated encoders, satellite receivers, and commercial switches, which makes sense only for businesses distributing proprietary local video. For entertainment, subscribing to a managed service like XIPTV PRO gives you access to 25,000+ pre-encoded 4K channels for as low as $5.83 per month.
Related Guides & Technical Resources
Continue exploring advanced video streaming with our technical guides:
- Best IPTV Service in USA (2026 Complete Review): In-depth testing of server uptime, CDN speed, and multi-device compatibility.
- How to Watch Sports Without Buffering: Router QoS, bandwidth allocation, and protocol optimization for live sports.
- Cable TV vs IPTV Cost Comparison: Why digital streaming saves households over $1,100 annually.
Conclusion: Bridging Physical Video and IP Networks
Knowing how to convert HDMI to IPTV provides unmatched control over private video distribution. Whether you are modernizing a 40-screen sports bar, broadcasting church services across campus overflow rooms, or designing an interactive hotel television system, hardware video encoders deliver clean, low-latency streams without running bulky video cables.
Yet for home entertainment and sports viewing, deploying on-premise hardware is unnecessary. By choosing XIPTV PRO, you tap into commercial-grade encoding infrastructure and dedicated Anti-Freeze CDN servers for only $5.83 per month.
Ready to Stream 25,000+ Live 4K Channels With Zero Hardware Hassle?
Skip the $32,000 headend hardware investment. Get instant automated activation, 99.9% uptime, and complete NFL, NBA, UFC, and Hollywood VOD access today.
🔒 Backed by our risk-free 7-day money-back guarantee. Instant credentials delivery within 2 minutes.
Alex Mercer
Lead Streaming & Network Engineer at XIPTV PRO
Alex has 8+ years of experience evaluating video streaming hardware, multi-channel headends, low-latency CDN distribution, and enterprise IPTV network protocols.